ServiceNow Integration
Overview
The ServiceNow integration allows you to create, manage, and track incidents directly from the platform. This integration streamlines your incident management workflow by providing a seamless interface to log and monitor support tickets.
Accessing ServiceNow
To access the ServiceNow module:
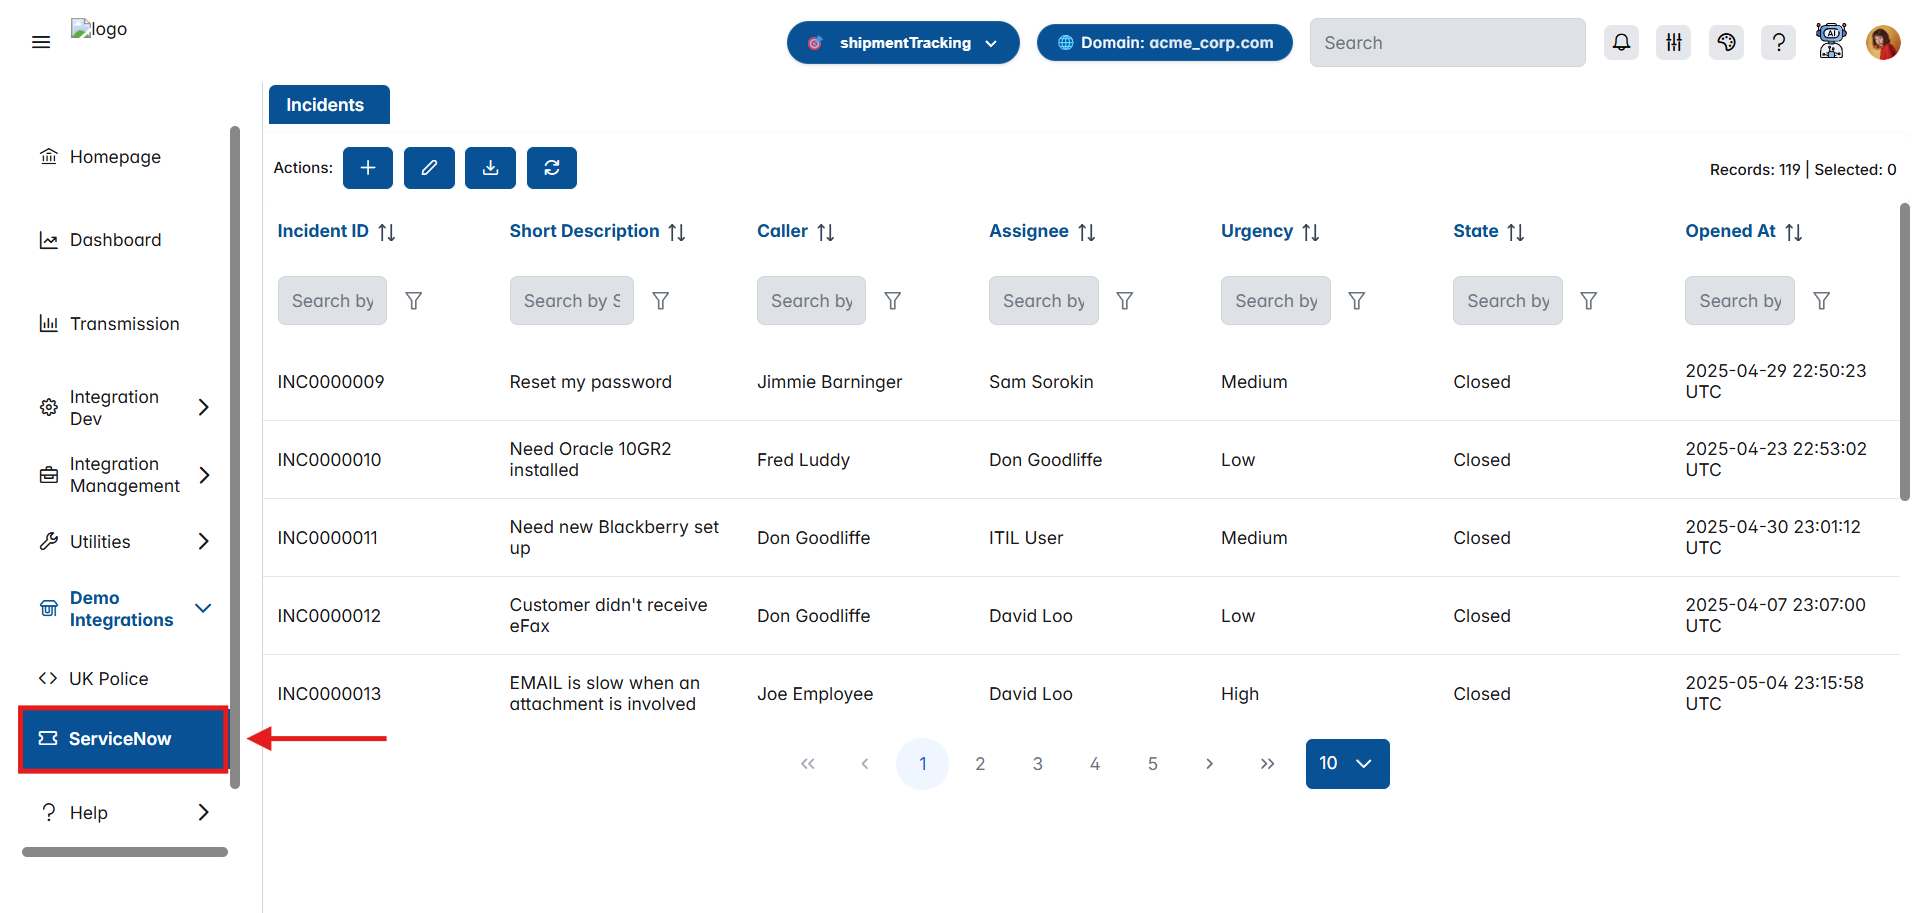
- Open the left navigation panel in the platform
- Expand the Demo Integrations section
- Click on ServiceNow
The ServiceNow incidents page will load, displaying all your incidents in a tabular format.
Incidents Table
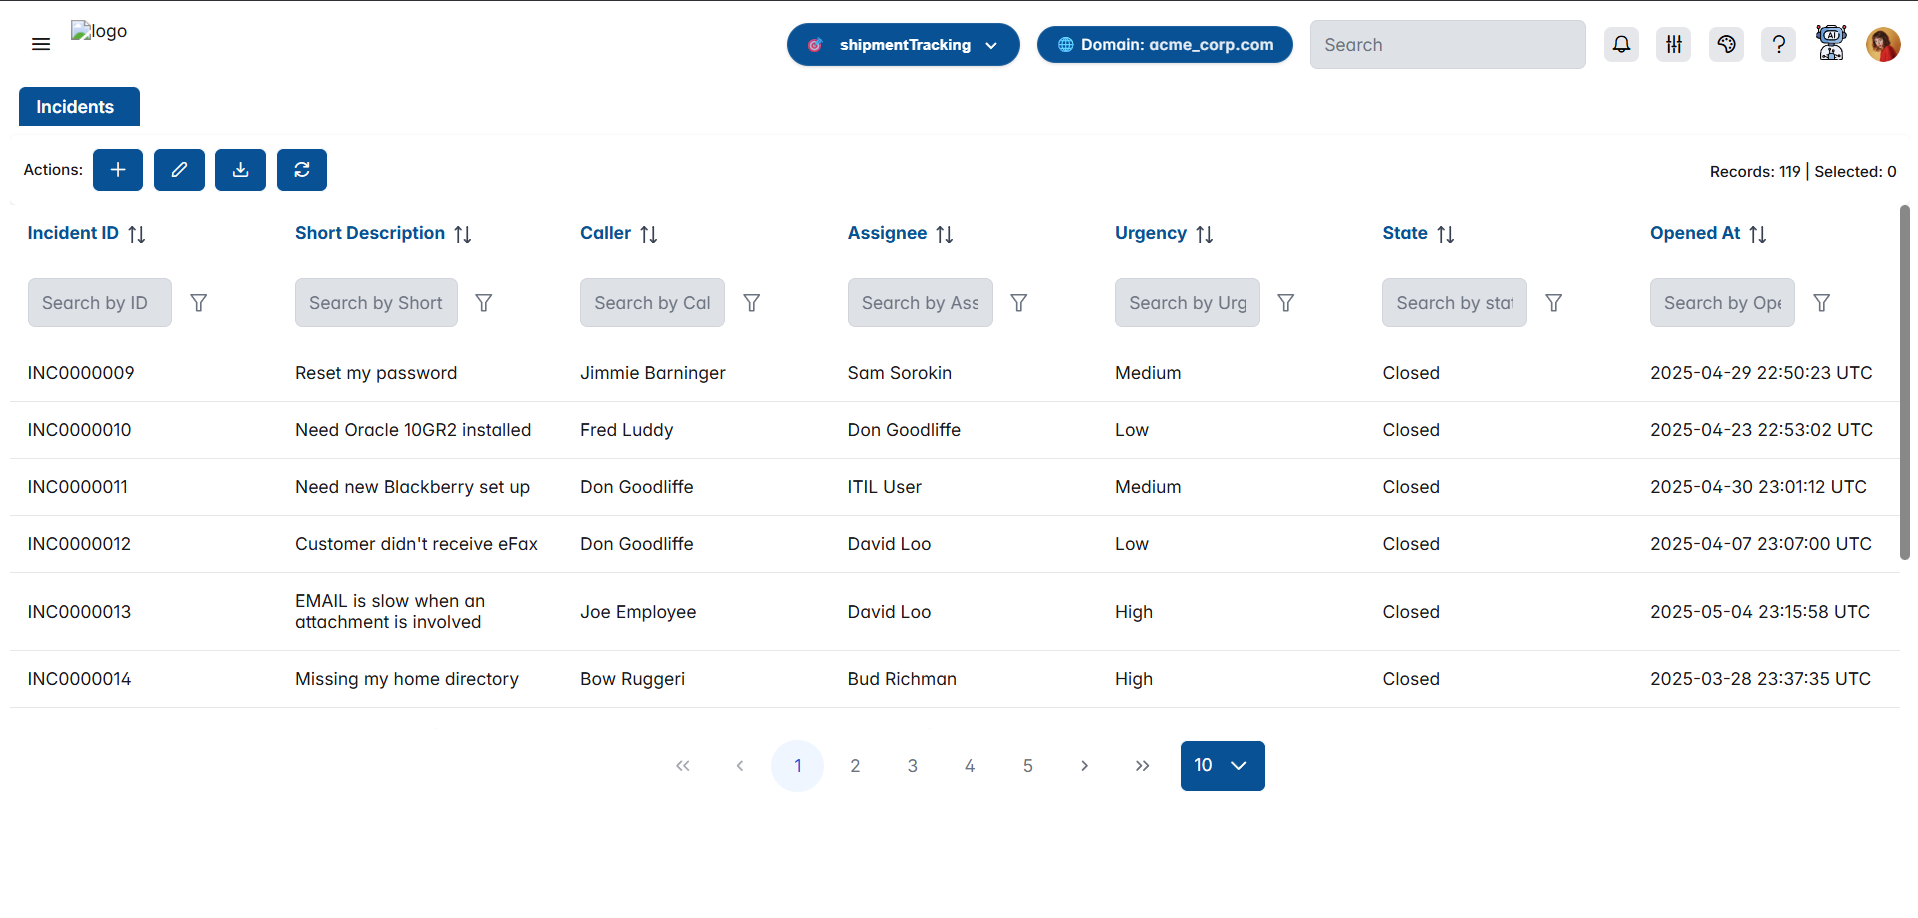
The main incidents page displays all your ServiceNow incidents with the following information:
Table Columns
| Column | Description |
|---|---|
| Incident ID | Unique identifier for the incident (e.g., INC0000009) |
| Short Description | Brief summary of the incident |
| Caller | Person who reported the incident |
| Assignee | Person assigned to resolve the incident |
| Urgency | Priority level (Low, Medium, High) |
| State | Current status of the incident (Open, Closed, etc.) |
| Opened At | Timestamp when the incident was created |
Search and Filter
Each column has a search box and filter icon that allows you to:
- Search for specific values within that column
- Filter the table to show only matching records
- Quickly locate incidents based on specific criteria
Pagination
At the bottom of the table:
- Navigate through pages using the page numbers (1, 2, 3, 4, 5)
- Use arrow buttons (< >) to move between pages
- Use double arrows (<< >>) to jump to first/last page
- Select records per page using the dropdown (default: 10)
The top right shows: Records: 119 | Selected: 0
Action Buttons
At the top of the incidents list, you'll find four action buttons:
1. Add New Incident

- Purpose: Create a new incident
- Action: Opens the "Add Incident" form
- Color: Blue button with plus icon
2. Edit Incident

- Purpose: Edit an existing incident
- Action: Opens the "Edit Incident" form for the selected incident
- Requirement: You must select an incident from the table first
- Color: Blue button with pencil icon
3. Download

- Purpose: Export incident data
- Action: Downloads the incidents list (likely as CSV or Excel)
- Color: Blue button with download icon
4. Refresh

- Purpose: Reload the incidents list
- Action: Fetches the latest data from ServiceNow
- Color: Blue button with circular arrow icon
Creating a New Incident
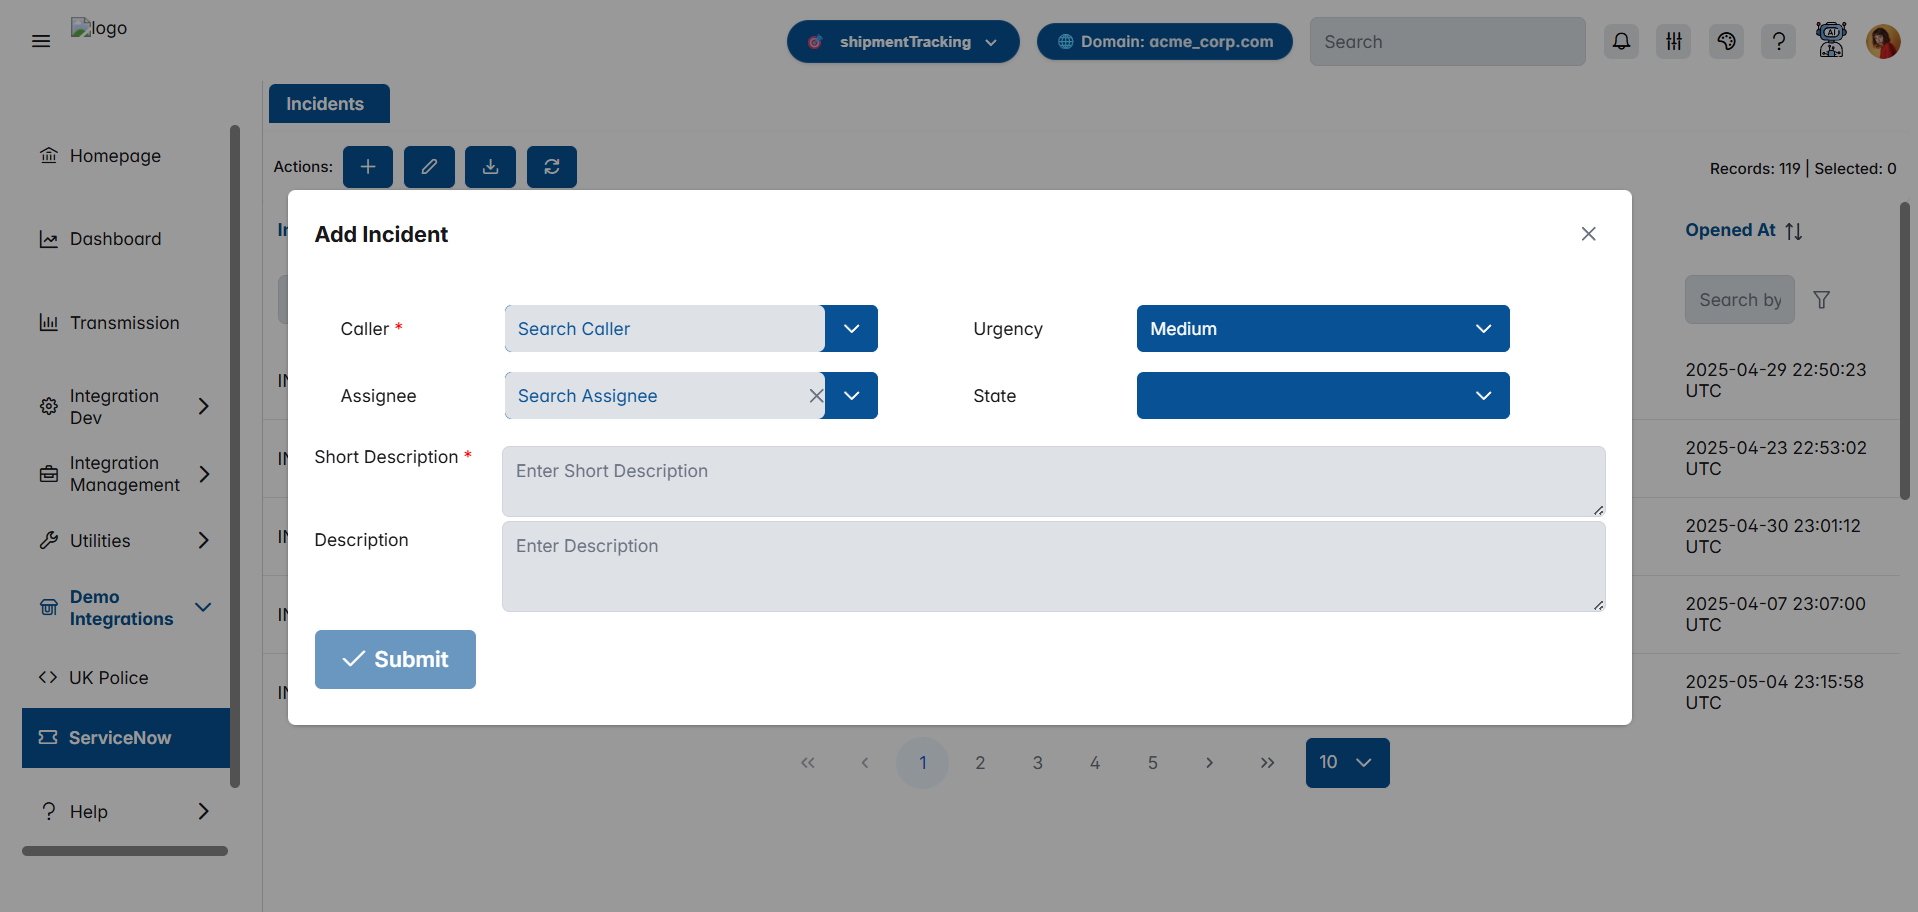
To create a new incident, click the + (Add) button in the Actions toolbar.
Add Incident Form Fields
Caller *
- Type: Searchable dropdown
- Required: Yes (marked with red asterisk)
- Description: Select the person reporting the incident
- Features:
- Search functionality to find users
- Clear button (×) to reset selection
Urgency
- Type: Dropdown
- Required: No
- Default: Medium
- Options: Low, Medium, High
- Description: Indicates the priority level of the incident
Assignee
- Type: Searchable dropdown
- Required: No
- Description: Select the person who will handle the incident
- Features:
- Search functionality to find users
- Clear button (×) to reset selection
State
- Type: Dropdown
- Required: No
- Default: New
- Description: Current status of the incident
- Options:
- New
- In Progress
- On Hold
- Resolved
- Closed
- Canceled
- Note: Selecting "Resolved" or "Closed" will reveal additional required fields (Resolution Code and Resolution Notes)
Short Description *
- Type: Text input
- Required: Yes (marked with red asterisk)
- Description: Brief summary of the incident
- Placeholder: "Enter Short Description"
- Purpose: Provides a quick overview of the issue
Description
- Type: Multi-line text area
- Required: No
- Description: Detailed explanation of the incident
- Placeholder: "Enter Description"
- Purpose: Provide comprehensive details about the issue
Submitting the Form
Click the Submit button (with checkmark icon) to create the incident. The form will validate that all required fields are filled before submission.
Caller and Short Description are mandatory fields. You cannot submit the form without filling these fields.
Editing an Incident
To edit an existing incident:
- Select an incident from the table by clicking on it
- Click the Edit (Pencil) button in the Actions toolbar
Edit Incident Form Fields
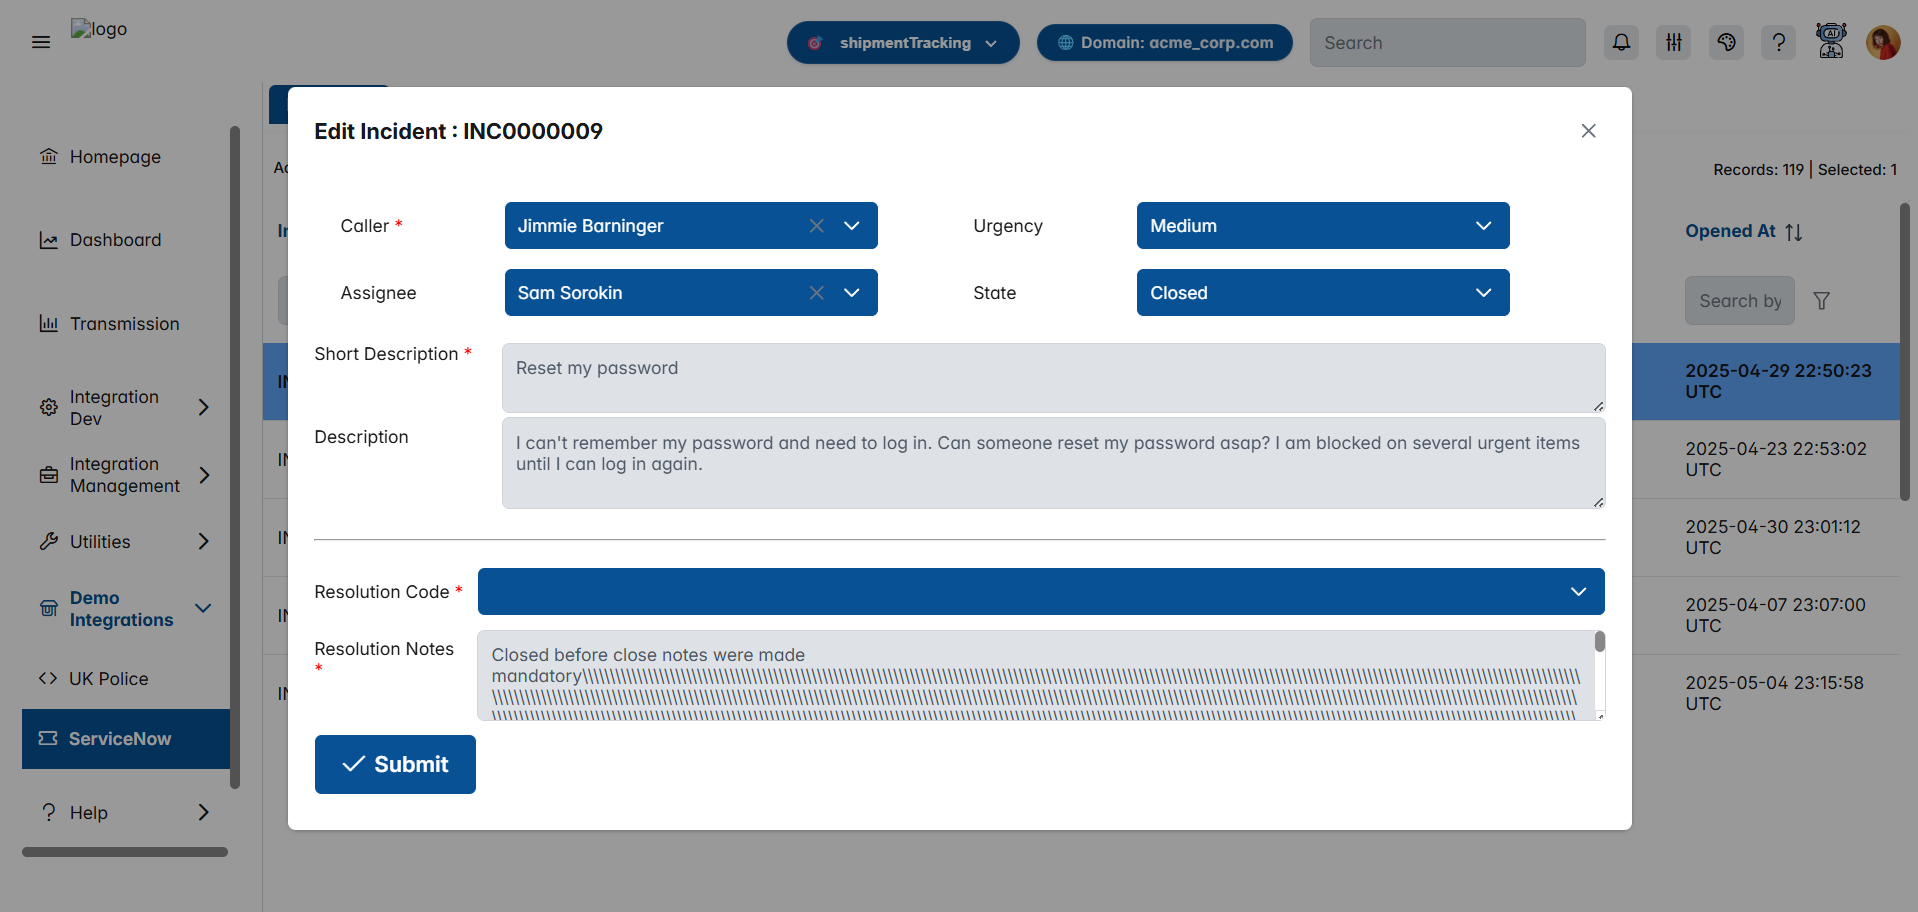
The edit form contains all the fields from the Add form, plus additional fields:
Caller *
- Type: Dropdown (pre-populated)
- Required: Yes
- Description: The person who reported the incident
- Note: Shows the current caller value
Urgency
- Type: Dropdown (pre-populated)
- Required: No
- Description: Current urgency level
- Example: Medium
Assignee
- Type: Dropdown (pre-populated)
- Required: No
- Description: Currently assigned person
- Example: Sam Sorokin
State
- Type: Dropdown (pre-populated)
- Required: No
- Description: Current incident status
- Example: Closed
Short Description *
- Type: Text input (pre-populated)
- Required: Yes
- Description: Brief summary of the incident
- Example: "Reset my password"
Description
- Type: Multi-line text area (pre-populated)
- Required: No
- Description: Detailed explanation
- Example: Full description of the password reset request
Resolution Code *
- Type: Dropdown
- Required: Yes (only when State is "Resolved" or "Closed")
- Description: Reason for resolving/closing the incident
- Purpose: Categorizes how the incident was resolved
- Options:
- Duplicate
- Known error
- No resolution provided
- Resolved by caller
- Resolved by change
- Resolved by problem
- Resolved by request
- Solution provided
- Workaround provided
- User error
- Visibility: This field only appears when State is set to "Resolved" or "Closed"
Resolution Notes *
- Type: Multi-line text area
- Required: Yes (only when State is "Resolved" or "Closed")
- Description: Detailed notes about the resolution
- Purpose: Document what actions were taken to resolve the incident
- Rows: 3 lines
- Visibility: This field only appears when State is set to "Resolved" or "Closed"
- Note: Provide comprehensive details about how the incident was resolved for future reference
Updating the Incident
Click the Submit button (with checkmark icon) to save your changes. The incident will be updated in ServiceNow.
When you change the State to "Resolved" or "Closed", two additional fields will appear and become mandatory:
- Resolution Code - You must select a resolution category
- Resolution Notes - You must provide detailed notes about the resolution
The Submit button will be disabled until all required fields are filled, including these conditional fields.
Field Requirements Summary
Always Mandatory Fields (marked with *)
- Caller - Required for both creating and editing incidents
- Short Description - Required for both creating and editing incidents
Conditionally Mandatory Fields
These fields become required only when State is set to "Resolved" or "Closed":
- Resolution Code - Must select one of the 10 available options
- Resolution Notes - Must provide detailed resolution notes
The Resolution Code and Resolution Notes fields are hidden until you change the State to "Resolved" or "Closed". Once visible, they become mandatory and the form cannot be submitted without them.
Optional Fields
- Assignee - Can be left empty
- Urgency - Defaults to "Medium" if not specified
- State - Defaults to "New" for new incidents
- Description - Additional details (optional but recommended)
Best Practices
- Use clear, concise short descriptions
- Provide detailed information in the Description field
- Set appropriate urgency levels based on business impact
- Assign incidents to the correct team members
- Use the search and filter features to quickly find incidents
- Regularly refresh the list to see the latest updates
- Always add resolution notes when closing incidents for future reference
- Select appropriate resolution codes for better reporting
Troubleshooting
Cannot Submit Form
- Ensure all required fields (marked with *) are filled
- If State is "Resolved" or "Closed", verify that Resolution Code and Resolution Notes are filled
- Check that you've selected values from dropdowns, not just typed text
- The Submit button will be disabled (grayed out) if validation fails
- Verify your connection to ServiceNow is active
Cannot Edit Incident
- Make sure you've selected an incident from the table first
- Check that you have the necessary permissions to edit incidents
- Verify the incident is not locked by another user
Incident Not Appearing in List
- Click the Refresh button to reload the latest data
- Check your filter settings - you may have active filters hiding the incident
- Verify the incident was successfully created in ServiceNow